
Si creías que ya lo habías visto todo en el mundo del maquillaje y que se acababa en cómo contornear como un artista del renacimiento para conseguir los pómulos más marcados del planeta y cómo tener una piel de supermodelo, debes saber que aquí no se acaba la cosa. Llega la técnica del strobing y yo te traigo un tutorial para conseguir ése look luminoso que todas queremos desde que vimos las primeras fotos. ¿En qué se basa ésta técnica de maquillaje?. Una palabra: iluminar. Si quieres saber más, ¡sigue cotilleando! ;)
If you thought you had seen everything about makeup and that it pretty much ended on how to contour like a renaissance artist to obtain the most sculpted cheekbones on the face of the Earth and how to obtain a supermodel's skin, you have to know it is not the end, but the beginning. Ladies and gentleman, I present you the strobing technique and here I am bringing you a tutorial on how ti obtain that radiant look we all wanted since we got the first impressions of it. But, what is this makeup technique based on?. One word: highlighting. If you still want to know more, then just keep on reading! ;)

Lo primero que has de saber antes de empezar a hacer tus pinitos con ésta técnica, es que requiere de una piel con muy pocas imperfecciones puesto que los iluminadores muchas veces lo que hacen es enfatizarlas. En el strobing se suelen utilizar productos de cobertura ligera para aportar a la piel ese aspecto radiante y jugoso, y el uso de los polvos está limitado a zonas estratégicas. Si tienes la piel grasa o con tendencia a serlo, yo te recomendaría que no lo llevaras a cabo de forma muy extrema, aunque si realmente quieres probarlo, adelante, pero ten en cuenta que puede dar un aspecto más graso a la piel si no se realiza bien.
Now, the first thing that you need to know before starting to make your first experiments with this technique, is that it requires of a pretty much flawless skin as highlighters tend to emphasize imperfections. Strobing requires light to medium coverage products so that you can obtain that dewy, glowy skin, and the usage of powder is restricted to certain strategic areas. If your skin is oily or tends to be oily, then I'd recommend not to use extreme strobing, but if you really want to try it, by all means, go ahead. Just keep in mind that this could give a more greasy appearance to skin if it is not done correctly.

Lo primero es preparar la piel. En mi caso, yo he usado tres productos: el iluminador líquido de NARS Hot Sand como una base luminosa en todo el rostro y luego, encima, he aplicado la base MAC Face and Body. Es muy ligera y acuosa, así que si necesitas una base un poco más cubriente, te recomiendo que mires otras como la NARS Sheer Glow, Lancôme Teint Miracle que además es muy luminosa, ó YSL Le Teint Touche Éclat. Una vez aplicada la base, realizaremos las correcciones allí dónde las necesitemos. Usaremos un corrector luminoso para poder hacer un inciso en las áreas dónde más luz queramos. También podemos usar productos específicos para iluminar de forma natural como el Touche Éclat de YSL.
Firts thing is to prep the skin. In my case I've used three products: NARS Hot Sand liquid highlighter as a luminous primer all over the skin and, on top, I've applied my MAC Face and Body foundation, which is very sheer and watery, so, should you need some more coverage, I'd recommend you to use the NARS Sheer Glow foundation, Lancôme Teint Miracle which is super luminous or YSL Le Teint Touche Éclat. Once the foundation is applied, we will start up the corrections with a luminous concealer so that we can emphasize on those areas where we need more light. You can also use more specific products for natural highlighting such as the YSL Touche Éclat.

Aquí yo ya tengo la piel preparada, así que paso a usar los productos que definirán el look luminoso. He empezado, principalmente, definiendo la luz general en todo el rostro. Para eso he usado un iluminador en barra de Shiseido que es súper cómodo de utilizar y además, muy cremoso y fácil de difuminar. Lo he aplicado en las zonas de luz principales: pómulos, frente, puente de la nariz y barbilla. Después, lo he difuminado con una brocha de base plana.
Here I have my skin already prepped, so I am using the products that will define the luminous look. I have started with the main highlighting all over the face. For this, I have used a solid highlighter by Shiseido which I've found to be super easy to use and is also very creamy and easily blendable. I have applied on the main highlighting areas: forehead, nose bridge, cheekbones and chin. After that, I blended it with a flat foundation brush.


Tras haber aplicado el iluminador en barra, he enfatizado esas áreas con la Cream Colour Base Diamonds de la colección RiRi hearts MAC. La he aplicado con una brocha plana de base en las mismas zonas dónde apliqué el iluminador sólido. El aspecto que da a la piel es muy jugoso y luminoso, aunque en las fotos no se aprecia bien debido a que la luz en éstos días ha sido pésima... Una vez terminado, aplico el colorete Mineralize de MAC en el tono Solar Ray, que es un color melocotón con una espiral dorada en medio. Es de acabado bastante satinado, más bien frost, lo que aporta aún más luminosidad al look. Lo difumino bastante con la brocha en dirección hacia el cabello.
After I've applied the solid highlighter, I emphasize it with MAC Cream Colour Base in Diamonds from the RiRi hearts MAC collection. I have applied it with a flat foundation brush in the same areas where the solid highlighter was applied. The skin looks dewy and luminous, even if the pictures cannot really show it. The lighting these past few days has been miserable... Once I'm done, I apply the Mineralize Blush by MAC in the shade Solar Ray, which is a beautiful peach tone with a golden swirl inside. It has a very satiny, almost frosty finish, so it gives even more luminosity to the look. I blend it quite well with the brush heading towards the hair.

El siguiente paso es el look de ojos. Va a ser muy sencillo, enfocándonos en lo luminoso. Aplico una prebase iluminadora, Urban Decay Eyeshadow Primer Potion en el tono Sin que es como un bronce suave y muy perlado. Encima, aplico la sombra Venus de la paleta Naked Basics de Urban Decay. A continuación, doy un poco más de luz en el centro del párpado y en el lagrimal con el Paint Pot de MAC Chilled on Ice. Usaré el iluminador Mineralize Skinfinish de MAC en el tono Lightscapade para iluminar bajo el arco de la ceja y sobre ella. Para finalizar, peino las cejas con el fijador Speed Brow de Benefit y aplico una máscara de pestañas para dar un poco más de volumen.
Next step is the eye look. It will be quite simple, focusing on luminosity. I apply a highlighting primer, which will be Urban Decay Eyeshadow Primer Potion in Sin, which is like a pearlescent bronce tone. On top of it I apply a sheer eyeshadow, Venus, from the Naked Basics palette by Urban Decay. On the center of the lid and the tearduct, I apply some of the MAC Paint Pot in Chilled on Ice. I will use the Mineralize Skinfinish highlighter in Lightscapade to illuminate the under and on top of the browbone. Last step will be to apply some brow gel like Benefit's Speed Brow and some mascara.


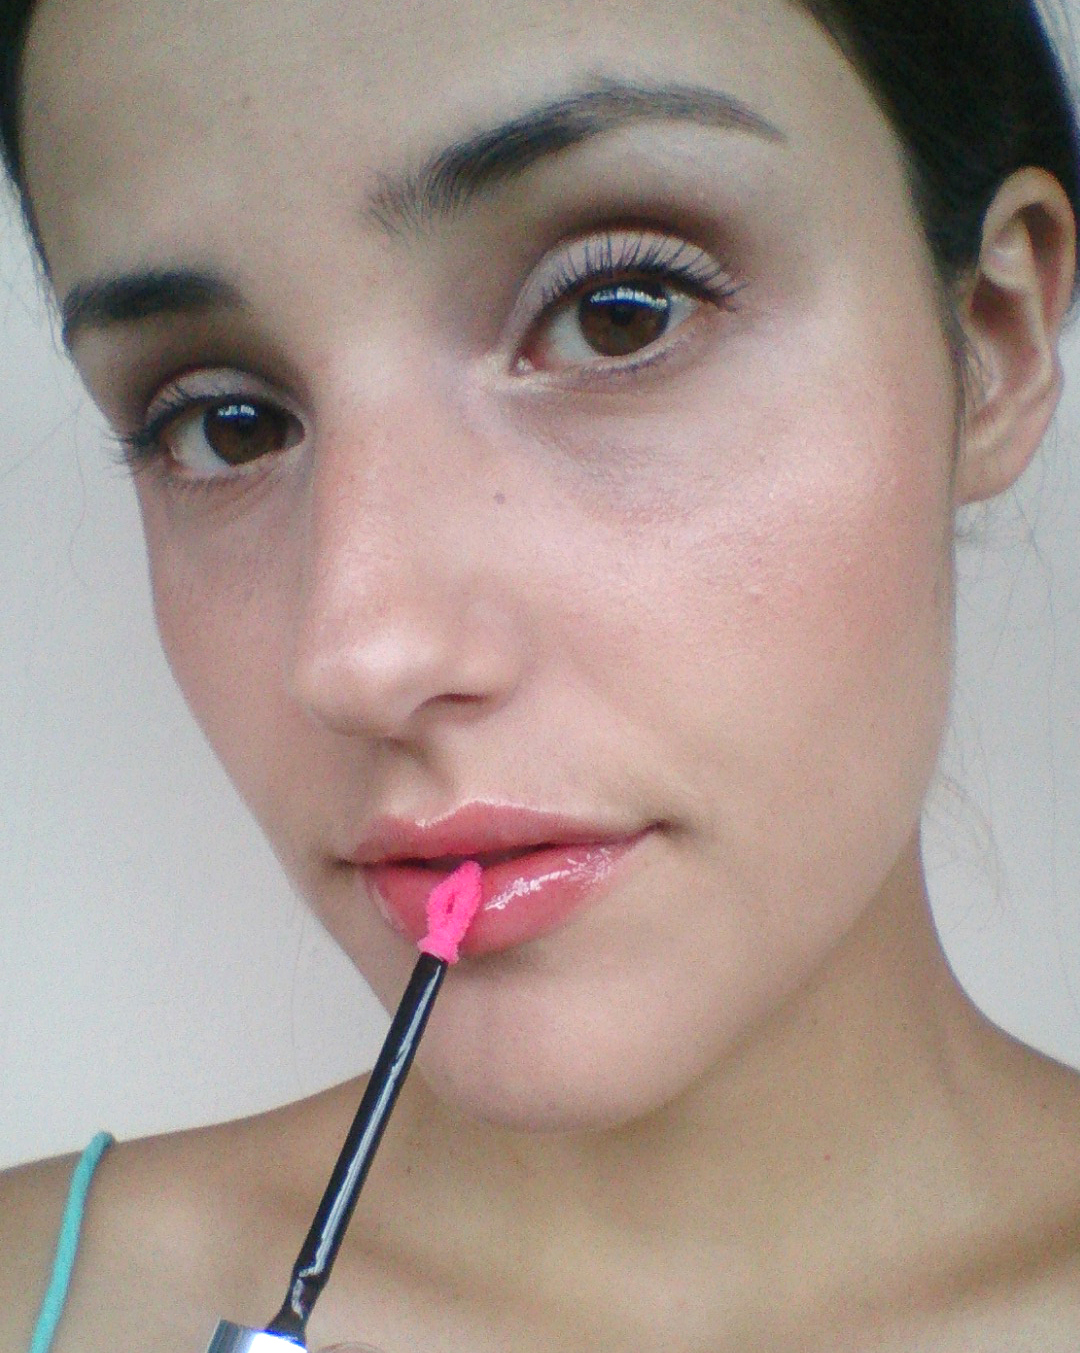
El último paso, será iluminar el arco de cupido (zona central del labio superior) para crear un efecto de mayor volumen y aplicar un gloss natural de acabado muy brillante. En éste caso, el ideal es el YSL Volupté Tint-in-Oil en el tono I Rose You.
Last step will be to highlight the cupid's bow to obtain a more volumizing effect on the lips and apply a super glossy lipgloss. In this case, I found the ideal one to be YSL Volupté Tint-in-Oil in I Rose You.

Y hasta aquí un pequeño tutorial consistente en la nueva tendencia de maquillaje, el strobing. ¿Qué te ha parecido?. ¿Lo intentarás?. A mi, desde luego, me gusta bastante y ya lo he intentado un par de veces. Lo cierto es que las fotos no le hacen justicia (no tengo el mejor equipo del mundo y estoy yo solita, ¡lo siento!. Lo hago lo mejor que puedo...). Es un poco arriesgado porque si te pasas con los iluminadores puedes obtener un efecto poco deseado que es el de una piel sudorosa o grasa. ¿Te vas a apuntar al strobing?. ¡Nos vemos pronto!.
And this has been a small tutorial on strobing, the new makeup trend. What do you think about it?. Will you be trying it out?. I find myself to be quite keen on it and I've already tried it out a couple of times. The truth is that these pictures aren't fair to the makeup look itself (but I don't really have the best equipment ever and I am on my own, so please, bear with me... I'm so sorry! I try to do my best). It is a little bit rsky if you go overboard with the highlighters as you can obtain an undesired effect of sweaty or greasy skin. Are you into strobing?. See you soon!.
And this has been a small tutorial on strobing, the new makeup trend. What do you think about it?. Will you be trying it out?. I find myself to be quite keen on it and I've already tried it out a couple of times. The truth is that these pictures aren't fair to the makeup look itself (but I don't really have the best equipment ever and I am on my own, so please, bear with me... I'm so sorry! I try to do my best). It is a little bit rsky if you go overboard with the highlighters as you can obtain an undesired effect of sweaty or greasy skin. Are you into strobing?. See you soon!.

¡Oye, pues queda bastante bonito! Me gustaría probarlo, pero creo que no será para mí, mi piel no es tan maravillosamente perfecta, ¡ay! ;)
ResponderEliminarUn saludito, nos leemos!
Teapots and Frills
Me alegra mucho que te haya gustado. Si tienes alguna que otra imperfección en tu piel, sólo tienes que usar una base un poco más cubriente que la que yo usé. El truco es realizar correcciones muy sutilmente de modo que la piel queda visiblemente perfecta :)
EliminarQue bueno, has quedado muy guapa. Tengo ganas de probarlo!
ResponderEliminarhttp://modernastrega.blogspot.com.ar/
Si te atreves a probarlo, cuéntame, que me encantará ver tu resultado :)
EliminarMe encanta,, cada vez que veo un rostro así maquillado me parece genial.
ResponderEliminarLo has hecho genial y me encantan todos tus productos.
Un besito guapa :)
Muchas gracias por estar por aquí una vez más. Me alegra mucho que te haya gustado mi elección de productos y espero que lo intentes tú también, así me cuentas cómo te ha ido :D Un abrazo!
Eliminara mi me encanta iluminar el rostro un monton, asi q el resultado no me puede gustar mas, uso unos polvos d emary kay los sheer dimension q son la autentica maravilla porque ilumina una pasada, y lo d elos labios tb lo hago muchas veces. Me encantó ller esta nueva tecnica gracias Ro!!! muakssss
ResponderEliminarQué bueno verte por aquí de nuevo, Belu!! Iluminar es una técnica estupenda porque rejuvenecemos el aspecto de nuestra piel al instante, a mi también me gusta muchísimo, pero reconozco que nunca había utilizado tantos iluminadores juntos :D. Un abrazo!
EliminarEs precioso para este verano, lo intentaré! Y te ves lindísima ;)
ResponderEliminarMuchísimas gracias, si lo intentas, déjame ver tus resultados ;)
Eliminar¡Me encanta, Ro! Qué ganas de poder fotografiar algo así :)
ResponderEliminarPues cuando tú quieras, ya sabes que estoy disponible!! ;)
EliminarPor tus fotos, veo que queda muy bonito puesto!
ResponderEliminarYo no soy de maquillarme mucho, pero me gusta aprender este tipo de cosas y conocer marcas
Nunca se sabe.
Las fotos te han quedado preciosas! :)
Buen recomendación!
Te invito a pasarte por mi blog
Nos leemos
¡Besos!
Muchas gracias, me alegra que haya sido de tu agrado y que las fotos te hayan gustado :). Paso por tu blog ;)
EliminarBuena recomendacion.
ResponderEliminarMe alegra que te haya sido de utilidad :)
EliminarEsta técnica está muy de moda en estos días, yo personalmente no me gusta iluminar tanto el rostro por mi edad, pero sin duda es muy bonito. Besos.
ResponderEliminarBelleza y Moda by Susie Rodena
Siempre podemos adaptar cualquier técnica a nuestro rostro y a nuestros gustos. Me alegra que te haya gustado :D
EliminarQue chulada!!! es la primera vez que veo este tipo de maquillaje.
ResponderEliminarSi te atreves a probarlo, cuéntame ;)
EliminarMuy buen post, aunque no me gusta mucho esta tendencia, saludos
ResponderEliminarKat Maquillaje y Accesorios
Gracias por pasarte por aquí :)
EliminarMuy buen post
ResponderEliminarExcelente post, muy bien detallado, la tecnica está en voga pero en mi caso en particular no lo usaría pues tengo el cutis graso y no es para mi, siento que es para pieles con tendencia de normal a seca y pieles jóvenes con mucha frescura. Besos linda.
ResponderEliminarMuchas gracias, me alegra mucho que te haya gustado el post. Un abrazo!
EliminarDefinitivamente no es para mi tipo de piel, pero a ti te queda espectacular. :D Besos.
ResponderEliminarMuchas gracias! Cuál es tu técnica favorita? :)
Eliminar